Showing posts with label Cosplay by McCalls. Show all posts

Thursday, November 2, 2017

McCall's Steampunk Patterns

McCall's has a couple of new steampunk accessories patterns.


M7705 Is a pattern by Formé Millinary with five different styles of perch hats.  There's a tricorn, bicorn, sidecap, and two other styles.  Some of these look better than others, in my opinion.  The styling as pictured is really questionable, especially the trim on the bicorn.   And I'm not sure how well-constructed any of these are.  But they might be ok as a basis for some little hats. 


M7706 has six different styles of spats.  They vary from small lacy ones, medium length ones and a couple of very tall styles.  My favorite one is the blue View C which would look a lot better if the details had been done in a contrasting color and not the exact same color.  The other long ones are just knit and look like they wouldn't stay up very well.  The others could be cute depending on fabric and decoration. 


Cosplay by McCall's has a new Lolita pattern with a really cute bustier, pannier supports, and a skirt.  The panniers would work for any 18th century pannier styled costume, so they might be useful beyond just this look.

Saturday, September 2, 2017

New Fall Sewing Patterns Megapost!

Simplicity

Simplicity has released a 1950's vintage pattern for a slip/petticoat.  The only thing to judge on is the drawings on the front, but they look nice and full.  But it doesn't seem to include any tulle or net to make these super stiff.  But you could add some, of course.  So it might be useful for various retro/rockabilly looks.


Along a similar line, Simplicity 8458 is a pattern for vintage skirts.  I like the button detail and contrast trim on the one skirt.  It has a vaguely dieselpunk-ish feel to it.


This cape pattern is part of Simplicity's "pattern hacking" line, which I guess means it has a lot of different details you can add?  But I like the cape with the tabs a lot, and if you do any steampunk events in winter, I HIGHLY recommend a warm cape.  My wool cape was wonderful at Steampunk November last year and I was warm for the first time at that event.


Sunday, June 11, 2017

New Steampunk Cosplay Patterns

Cosplay by McCall's has several new patterns that are a little interesting.

Foot Fetish: Gilded is a collection of "bootcovers" or spat-type accessories.  There are three versions: the cover style with straps and pleated trim, a pair with ruched fabric front and corset lacing in back, and some filigree low-top covers that go around the ankle.  They're all written to be made in synthetic leather with fabric trim and jewelry findings.

The instructions are pretty good at showing how to attach the pieces together, install eyelets and buckles, use blanket stitch to decorate and secure layers.

The main question about this pattern is whether it's really necessary.  The only one of the three designs I really like is the low-top cut-out one. I would probably leave the ruffle off it, though.  All of these are one-size-fits-all because they only cover the front of the boot/shoe and just have straps or lacing in the back.

And since I can't imagine many people wanting to exactly recreate these styles, if you're going to be adapting these to suit your outfit, it would be pretty easy to make your own basic front shape and decorate it as you wish.  So I can't see many people really would feel the need to buy this pattern.  Am I wrong? Is this pattern more useful than it seems?


Hand-Eye Coordination is a pattern for four different glove styles and three different eye patches and finger armor claws.  The "leather" portions are faux leather fused to cloth with fusible web.

The instructions in this pattern are actually pretty good at showing how to attach the various pieces using rivets, blanket stitch edging, and jewelry findings.  There is a paragraph encouraging using found objects to embellish the eyepatch in an individual style.

I do like some of the gloves, like the fabric gloves with laced bracer covering the wrists.  The claws aren't my style and I wonder how well they would hold up since they are just held together with interfacing.

But if you prefer you could use these patterns with actual leather, stitching or riveting it together mostly in the same way.

So whether this pattern appeals to you is mostly a matter of style, I think.  It also works as a plain glove pattern, so that could have uses in other types of costuming.


Becoming Emelie is a lolita style pattern for a bonnet, circular purse, and cape with tufted shoulders.  I love the bonnet, and I don't know that there's another commercial pattern for this style of hat. The pattern uses thick sew-in interfacing and the wire from a wire hanger to stiffen the hat.  That would probably work pretty well.  I especially love the gathered lining.

The purse zips closed and has a chain strap.  It uses batting for padding.  I'm not sure how sturdy the finished bag would be, but it is cute.

The cape is a really nice shape, short in the front and longer and full in the back.  It is fully lined and has lace edging.  The shoulders are tufted and beaded.  Personally I'm not wild about the shoulders, but you could leave that off the cape easily.

Finally the pattern includes a pattern and instructions for making fabric roses to decorate the bonnet and purse.  I love these kind of details and they look fun to make with scraps.

So I think this is another excellent lolita pattern from this brand, and one you probably definitely want if you make lolita outfits.  The cape would be great for steampunk, and with some different embellishments the bonnet and bag could as well.

Red Reign is a pattern by Ichigo Black that includes a corset, bolero, hoop and skirt.  This is one I didn't get a review copy of, so I can't say how the instructions are.  Which is too bad given it's a corset.  I did like the previous patterns by Ichigo Black, though.

I like the style, especially the jacket, skirt and hoops.  The corset is almost a bustier since it's so short and straight.  I would probably just use a different corset pattern that's curvier and extends further onto the hips.  (I like the corsets in this same pattern line as one option.)

Finally there is Eventide, which includes two different jackets with puffed shawl collars.

Without checking this strikes me as a design that looks like it's from Once Upon a Time.  Except for the collar, the cover version is just a nice feminine version of a frock coat and would work well for any pirate-themed outfit.  It could also work for a variety of different cosplays.

The shorter version is a little plainer, more of a bodice with the only really noticeable elements being the collar and the giant sleeves.  In both versions, I really hate the puffed collar.  I would automatically replace it with something more normal looking.

So I think the first version of this coat has a lot of possibilities for cosplay, steampunk, pirate, or goth wear.  (Minus the collar.  Sorry, I hate it.)

(In the interest of full disclosure I was provided review copies of these patterns at no cost.)

Saturday, April 22, 2017

Summer Steampunk Patterns from Simplicity and Cosplay by McCall's

Simplicity has two new steampunk patterns in their new collection.


Simplicity 8408 is a pattern for a man's shirt and two vests.    The shirt has two collar options: a band collar or wing style collar.  Other than that, it's a fairly plain shirt.

There are two styles of vests, as pictured on the front.  There's the long single-breasted one and the shorter double breasted vest.

Honestly I love everything about this pattern.  There really aren't enough men's steampunk patterns, although vest patterns are exactly rare.  But I like both vest looks and the shirt is a great addition to make this more than just another vest pattern.  The details on the vests with multiple pockets and nice collars all look nice.


Simplicity 8409 includes a bolero jacket and skirt, both with two variations.  

I'll admit on first looking at this, I wasn't very impressed.  It's a confusing look, especially the blue and red version.   But on studying the pattern a little closer, it's not that complicated.  The bolero jacket is nice, with some interesting details.  It's different from other steampunk boleros in other patterns at least.  (But I'd suggest wearing a shirt or corset or something under it. I don't think the bare skin look really works.)

And the long fringe on the one bolero style?  Well, it probably could work ok with the right outfit.  It'd be good for belly dancing.  But mostly I'm not in love with it.

The skirt comes in two lengths.  I naturally like the longer skirt much better, but that's really personal preference.  Although I'm not sure a really short skirt really screams "steampunk" but I'll try not to judge.  The corset-style belt is built into the skirt.  Obviously it's not actually a corset, just decorative, but I like it.  The skirt itself is made up of handkerchief style pieces, which is a neat look that would look very different in different fabrics.   The skirt would really be good for a casual steampunk look.

So although I wasn't super excited about this pattern on first glance, I'd say it's really kinda neat.  I don't like the way it's styled in the photos that well, with the bare midriff and clashing colors.  But I think it could look cool and be a good steampunk wardrobe addition.


I'll include a mention of Simplicity 8411 which is a version of the red dress from Outlander, obviously.  It's 18th century rather than 19th, but I figure some of y'all may be interested.  It's a pattern from American Duchess, which explains why it looks pretty nice.  The design isn't historically accurate, and I hated that bust in the show, but this is not a bad looking pattern.

In addition to the boned bodice (the pattern calls for cable ties!) and skirt, the pattern includes panniers, which could be very useful.  Maybe I just like panniers.


There are also a couple new Cosplay by McCall's patterns.  The first is Hat Madder which includes this skeleton mad hatter hat, bow tie, collar, and cuffs, and this flower/unicorn horm headpiece.

This pattern is freaking weird.  Just need to get that out there.  The mad hatter hat doesn't look very good in my opinion, mostly because the brim appears to have nothing to stiffen it, so it's just floppy all over the place.  It doesn't give the impression of a top hat so much as a trash can on top of a tortilla.  Like, I think this design could be neat, but it looks like someone tried it out and made a prototype and just said "meh, close enough."

The rest of the pattern is ok, and I like the weirdness of the unicorn horn thing, but I'm not sure any of it is really vital enough to require a $14 pattern.

Secondly there is Abigail by Anachronism in Action.  When I first looked at this pattern I said, well, it looks nice, but I have no idea what it's supposed to be.

The pattern is for a lined and boned vest/bodice, skirt, and petticoat.  From looking at the pattern it seems to be well-constructed.   But I remained confused as to exactly what period this outfit was supposed to represent, and neither the pattern envelope or the website really gave me much of a clue.

I had to go to Anachronism in Action's FB page to actually figure it out.  First she calls this a Renaissance-inspired outfit.  And then she also has an album of the outfit made up in a few different looks.  The album calls this a 16th century style.

So, great, mystery solved.  I can't really comment on the historical accuracy of this, since I don't know a great deal about 16th century costume.  But seeing some of the different renaissance festival stylings of this outfit makes me like it quite a bit more.  It could be a good option if you want a Renaissance outfit that doesn't look like everyone else's.

And I would say that if you're the kind of person who blends Renaissance and steampunk, this could be a good set to have in your closet.  I can picture either the skirt or the vest working with a steampunk outfit.

Wednesday, January 4, 2017

Cosplay by McCall's: Prelude and Hitched

I have some actual content coming soon, but I had to let you guys know about a couple of new patterns from Cosplay by McCall.

Prelude is a pattern with three styles of bloomers: a short and long version of voluminous bloomers and a lovely pleated style.  All three have a real antique feel to them (although I can't say they're accurate, as they seem to all be closed-crotch.)  But these really look different to some other patterns that tend towards skimpier and less blousy, more modern looks.  


I really love my bloomers and the days I wear those for steampunk, because it is a more dressed-down casual, comfortable look.  So this pattern looks like a great one to use.   And this is the kind of pattern that I don't think exists, so I'm really happy to see it.


Hitched is the second new pattern, and it's just a hi-low skirt in three lengths.  There's a short version which seems a little pointless for steampunk, but also a medium (two back tiers) and long (three back tiers) version.   The medium and long versions have D-rings attached to the front for gathering the front up with ribbon.


I have to say that I do really like this skirt.  If I'm looking to criticize I would say there could be a bit more volume in it, and that having only the skirt makes the pattern fairly expensive.

But the D-rings are a really good idea I wish I'd had first.

Wednesday, August 17, 2016

New Cosplay by McCall's Patterns: Renegade and Sentinel

Today Cosplay by McCall's has released two new patterns in their premium line.

I'm really excited about the first one, Renegade.

It's a plus size corset pattern from Anachronism in Action, with a laced halter top.   I remember the first time Kelly made a corset with this top, so I'm super excited she's released a pattern for what is one of her signature pieces.

 It's only available in plus sizes, due to apparent high demand for plus size corset patterns.  Smaller sized people are going to have to do some pattern modification for once if they want to use this one.


The back view is the really exciting part, as you can see how the belt and harness top connect.  This is a look that can work with a lot of potential styles from a sexy modern club look to a more steampunk antique feel.

Plus if you don't like the top, this is just a nice, fairly standard plus sized underbust pattern. There are two different plus sizes for this pattern, going up to a 32W size, which should really cover a ton of women.  It's great to see them expanding their size offerings.


The second pattern released is Sentinel, a more medieval fantasy styled costume.

It consists of a tunic, vest, separate hood, and bracers.  While this isn't obviously steampunk, I do really like the design.


The tunic is very attractive and could probably work for everyday clothing if you're adventurous.  And the vest has a nice shape that could be used in a steampunk outfit as well.  All together these pieces say fantasy, but as individual pieces I think they could work in a variety of looks.


What do you guys think?  Is this line of patterns doing a good job of appealing to you?


Tuesday, June 28, 2016

New Patterns of Interest - Steampunk and DC and Doctor Who

Hi guys!

I've had a lot going on both personally and professionally.  I have had a stream of corset commissions, which is GREAT, but it's kept me busy in the studio.  I haven't had a chance to do much sewing for myself or work on any new cosplays or designs.

There are two newer Cosplay by McCall's patterns out, but only one of them is going to be of much interest for steampunk.

And that is Notched, a men's Victorian styled overcoat.

It's an attractive coat.  But I have to say that I think it's a bit of a cheat to call this two views.  It's the same exact coat, with the same exact button placement and pockets and everything else.  The only difference is that one has a contrast binding and one does not.  So the pattern is exactly the same but the instructions are slightly different.
The back is really nice looking as well.  The skirt is nicely full, which you don't always get in men's modern coats.  

Of course this pattern isn't only good for Victorian or steampunk clothing.  It would be good for several Doctor Who costumes like the 10th Doctor or Jack Harkness.

So, based on what I can tell from looking at the pattern (which was generously sent to me by McCall's) this is a nice pattern, if an overcoat is what you want.  I do think it is a little limited, since it's basically just one item.  

But if you live in a cold climate, a good coat is an important part of your steampunk wardrobe so it may be worth it to you.

Simplicity has a new line of DC bombshells patterns.  They're not steampunk, but I think the retro/pin-up style is of interest to my readers, so if you haven't seen them, here they are.  


Supergirl - I love the flare of the skirt on this one.  


Wonder Woman - I love the retro shorts, and think you could almost use them for steampunk with the right outfit.  


Batgirl - This is fun, with the utility belt (which hey, you could also use for steampunk!).


Here is a man's DC costume for the Joker.  Of course it's also an outfit that in other colors/fabrics would be perfectly steampunk. 

There hasn't been a mainstream tailed coat pattern, so this is good. Unfortunately, it doesn't include a pattern for the spats in the photo.


This Doctor Who costume is interesting.  It's a strange combination of Doctor Who and steampunk without really being either one.  It's fairly basic, especially the skirt and pants, which are both elastic waists.  I do really like the bolero.  The corset on the dress outfit doesn't do anything for me, shape-wise. The interesting thing is that the vest on the left is actually a corset with laces in the back.  But I'm not entirely sure how it works from the line drawings.  


And finally, I just really like this dress/style.  And on first glance, I thought this was an intentional Dalek dress, but I'm pretty sure it's not.  I guess I could be wrong and it's a faux Dalek and the blue one is meant to be TARDIS-y.  But those are flowers.  I guess it could be really undercover geeky.  

And I've decided this length of skirt is what I want to wear all the time.  It's about the length of my cancan skirts, which are my most frequently worn steampunk items.


Monday, May 9, 2016

Cosplay by McCall's Pattern Review: Belle Rogue and Belle Noir

 I was excited to get a close look at these two new patterns because I think they have a lot of potential for steampunks.  I'll start with Belle Rogue because it's my personal favorite.

First the tulle skirt.  Everything about how the skirt is put together and made makes sense.  There's a lining under the tulle and an elastic waist.  Really the more I look at this skirt, the more I want to make myself one.  Now I just need the money for a metric crap-ton of tulle.

The detachable train is a little more disappointing.  It's made from pre-ruffled chiffon, so basically it's just a piece of fabric shaped into a train with a bow.  It's not exactly something most people would need a pattern to figure out.  I like it ok as a design feature, but as a pattern it's fairly useless.

Then there's the corset.  I said some pretty negative things about this corset based on the photos, but I do have to take some of those back.  I was totally surprised to find the instructions for the corset construction are actually...pretty good!  It's got a floating fashion layer, which means the bone casings aren't sewn through the top layer.  The base lining layer is constructed with seam allowances pressed to one side of each seam, and the bone channel sewn into the seam allowances.  You'll note this method avoids the problem I had with the other corset patterns from this line, the weakness of pressing seam allowances open in a corset.  If I were going to make a corset with a floating fashion layer, this is how I would do it.  In fact, I have done this.

The pattern also recommends using spiral steel boning and gives good tips on cutting boning yourself instead of buying it pre-cut.  The top and bottom edges of the corset are put together in a non-typical way.  The floating layer is sewn to the top and back right sides together and then flipped, so the edges are finished without binding.  I've never tried this, but it is a neat option for a corset with a floating top layer.  The bottom is then sewn closed and there is a large pleated ruffle that goes over it.  I would almost definitely still bind the bottom edge to prevent fraying and just for neatness sake, though the pattern doesn't call for it.

I like the ruffle and bows (which are removable or movable as they are attached to pin backs) on the bottom of the corset.  It definitely adds a lolita flair and helps the corset blend into the skirt.  So all that is fine, in my opinion.  The only problem I still have with the corset is the shape of it.  It's not very curvy.  The panels are really pretty straight up and down other than at the very front of the bust.  So this might work ok for a thin, straight figure, but would be uncomfortable or poor fitting on anyone curvier.  And I haven't tested the sizing, but I'd imagine you can safely go down two sizes from the recommended size for the corset portion.

Monday, May 2, 2016

Cosplay By McCall's Pattern Review: Shapeshifter

Y'all know I get excited about new corset patterns.  There are a lot of corset patterns out there but not that many I would really consider "great."  There's a particular shortage in underbust patterns.  So having this new Shapeshifter pattern is pretty exciting.

If you remember my earlier post on the topic, I was hopeful for the two new corset patterns because they are designed by Kelly Cercone of Anachronism in Action, whose work I have admired.  But I was still a little hesitant because I know that pattern designers don't really get a say in sizing or instructions, which are even more important with corsets than with other patterns.

Once I got my hands on the pattern I was excited to see this is actually two distinct corset patterns.  One has large hip gores and one is a more traditional straight paneled corset.  The version with the hip gores appears to be made for a more curvy figure than the other.

So here's a confession: I've never made a corset with hip gores. It's something you see a lot in historical patterns, but not so much with modern corsetry.  And I've just never felt a need for them or had reason to play with them.  Plus patterning hip gores to match measurements is a little tricky.  So I was interested to use this as an excuse to play with hip gores.  Plus I felt the hip gore version was more likely to fit my large hip-spring.

So I decided to test the gore version, View B.  And to get an accurate idea of how the pattern fits, I followed the size chart on the envelope to choose my size. Normally I always recommend going down two full sizes when making a corset from a Big 3 pattern company. But maybe this would be different.

First, let me clarify that unlike the first three patterns in the Cosplay by McCall's line, the two corset patterns come in two different size ranges.  6-12 and 14-22 it appears.  This feels a bit cheap to me, given how little pattern tissue is actually in the envelope.  They could have easily included all the sizes and still had less tissue than some of the first group of patterns.  When the prices are $21.95, I would feel a bit ripped off by not getting all the sizes.  The main competitors for a pattern like this, an indie company like Truly Victorian includes all sizes for $16 or so.  On the other hand a lot of corset patterns on Etsy only include one size, so I guess it depends on your basis for comparison.

First mock-up.  High class bathroom mirror selfie.
So my measurements best fit size 22 by their chart.  So I dutifully cut out size 22 for a mock-up.  I used some plain cotton because I was running low on cotton duck, which I use for mock-ups for my clients.  The stronger the fabric you use for a mock-up the closer it will be to your final corset, but this was good enough for me to get an idea of the fit and sizing of the pattern.

Closed all the way.
I'll talk about the instructions in detail in a minute.  I did follow the instructions for inserting the gore.  That was a little tricky.  Gores are always tricky, which is why I generally don't recommend them for beginners.  It's a curved seam and in this case there aren't a lot of guides to help you line up the pieces correctly.  Luckily the instructions told me to clip the main corset body along the seam, or I'd never have managed to get the gore to fit.  So it IS a little challenging, but I think that's the nature of gores.

Side view that shows how much it gapes at the top.
One thing I noticed about this pattern is that all the sizing is done on the front and rear panel.  The three side panels and the gore are the same for all the sizes in this envelope.  I understand why it's done that way, but it's a little different from what I'm used to.

So while my mock-up was pretty rough, with thin fabric and the bones stuck in with masking tape (good tip for fast mock-ups!), it told me what I wanted to know.  This was way too big.  It closed with no effort and wasn't reducing my measurements at all.  It was particularly big at the underbust, shown in the side view where I could have taken out an entire panel.

So I was not very surprised to find this pattern holds to the overall rule that Big 3 corset patterns run large.  They continue to add ease into the patterns despite the fact that corsets need negative ease.  However, I did like general shape.  So I did what I normally would have done from the beginning and went down two sizes, this time going with size 18.


You can see there's already a pretty big difference in shape from the back view.  And the gap is pretty perfect, really.  My mock-up is pretty beaten up by this point, and the taped in bones are barely holding on, so that's why there are significant wrinkles and some bunching up.

But overall, this was really comfortable and I think it looks pretty nice.  I'm surprised it fits me as well as it does.  Now I could take some more in at the waist and get a more extreme reduction.  This is actually a pretty relaxed shape for me with the waist sitting higher than I normally place it.  So it's not cupping in under my ribs.   But this would make a good light lacing alternative to my self-drafted underbust.


So yeah, I'm quite happy with this.  So much that I'd say it's pretty likely I'll go ahead and make a corset for myself with the pattern.  (If I ever get time, that is.)  Again, this is with no modifications, just the standard size 18.

Now let's talk about the instructions included with the pattern.  Both this pattern and the overbust Laced use the same basic construction method.  They have you assemble the layers of the corset separately by sewing all the panels of each layer together, then pressing the seam allowances open and stitching 3/8" away from the seam to form casings from the seam allowances.
This is not a method that I am very fond of.  I've only made a corset once where I pressed the seams open and double boned using the seam allowances.  It was a very pretty corset, but the second time I wore it, one of the seams on the back ripped open when I leaned back in a chair.  I had double-stitched each seam, knowing this wasn't the strongest method of construction, but it still failed in a massive way.  Because when you press the seams open like this, the only thing holding your corset together is the thread of the stitches. And because corsets have so much tension on them, this isn't the best idea.

This is one reason I love the Folded Seam or Welt Seam method, because the seam allowances are all pressed one direction and each seam is stitched through all the layers in three different places.   But that method isn't possible for all corsets and some people don't like it for various reasons.  The gore version of this pattern wouldn't work with the Folded Seam method because not all the pieces run from the top to the bottom of the corset.  So what I would do for this style corset is use bone casings placed on top of the seams, either on the interior or exterior.  When you center a bone casing over a seam and then stitch it down on each edge, the bone casing is taking some of the strain off the seam and reinforcing it.
From thecuttingclass.com

The other thing you could do, would be to make this corset as instructed, but have two layers of strength fabric.  Press the seam allowance to one side instead of open, (as illustrated by the closed seam picture to the right) and topstitch through the seam allowances next to the seam.  This reinforces the seams as well.  Then combine the layers and stitch your bone channels through all the layers.  To avoid more bulk on one side of the seam you can press your top layer's seam allowance one way and the lining/strength layer seam allowance the opposite way.

When working with several layers of corset that are combined at the end, it's important to be very precise when stitching, keeping your seam allowances exactly even so that when you lay one layer on top of the other, all your seams line up.  This is one reason I try to avoid making corsets this way, because any slight differences in seam allowance width can lead to wrinkles in your finished corset.

So, the instructions are okay, and seem pretty detailed and clear, but it's important to know this is only one of many ways to construct a corset, and, in my opinion, not at all the best way.   As a final detail, the pattern includes pieces and instructions for making a floating boned modesty panel.  It's essentially exactly as I make them, and it's a nice detail that I haven't seen in other corset patterns.

So that's my look at this pattern.  I've only tested and tried one version of the Shapeshifter.  View A appears to allow for less curve and smaller hip sizes and less difference in the waist-to-hip ratio.  So I like that there are two silhouettes included in the pattern because certainly body shapes differ.

I'm curious to see what the overbust Laced pattern looks like put together as well, but I simply don't have time to try that one at the moment.  I'm a little disappointed to note that while there are three views of Laced, the only apparent different in them is the shape of the top of the corset at the bust. Unlike this pattern there aren't two different silhouettes, which would, in my opinion, make the pattern more useful.


Thursday, April 28, 2016

Cosplay by McCall's New Patterns: Belle Rogue and Belle Noir

McCall's is continuing to release very interesting patterns in their new cosplay line.  Today's two new patterns are designed by Ichigo Black and are influenced by Japanese goth, lolita, and steampunk styles.  I have to personally admit I don't know enough about Japanese fashion trends to know if these patterns fit any specific style.  I know they aren't really lolita, but I can see the influence.

So anyway, here they are.


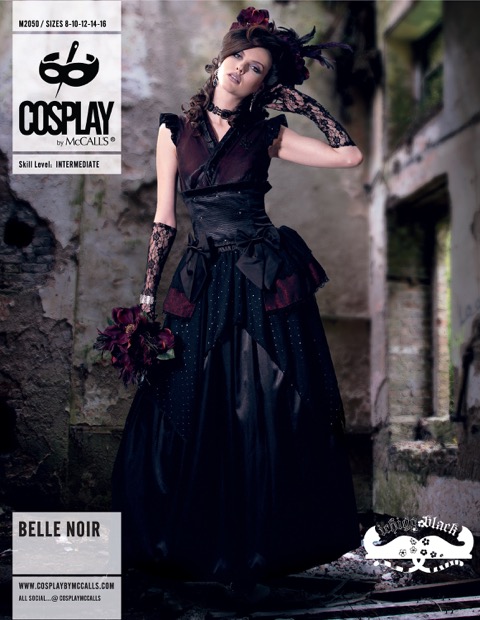
Belle Noir is interesting.  It includes a blouse, two layer skirt, bustle overskirt, detached sleeves and a fascinator.   So I guess the big question for readers of this blog is: "Is this steampunk?"   And I'm pretty comfortable saying yes.  As you can see from the side-view below it's got a Victorian silhouette to the skirt/bustle.  So it feels like a modern take on Steampunk.  It's not your traditional steampunk outfit, but I feel like we can desperately use some different interpretations of the style.


And this would look totally different in colors other than black, as well.  It's difficult to make out all the layers and details with it all in black.  (My old goth soul hates me for saying that.)

So yeah, I like it.


And here is the second pattern: Belle Rogue.  (Ok, part of me is wondering if that was supposed to be Belle Rouge to go with Belle Noir.  But whatever.)

So this pattern includes "Corset, skirt and accessories."  The corset top is one piece, then the tulle skirt with overskirt is one piece, with a detachable train.  And it includes hair bow and wrist cuffs.

So I LOVE the skirt.  The look of the layered and striped tulle with pulled up overskirt is fantastic.  The train is nice, but doesn't do much for me personally.  This does have a gothic bridal look to it, though, so it would work for that.

I am not very impressed by the look of the corset.  It is "lined and boned" but looks to fit very loosely (probably because of too much ease in the pattern sizing) and doesn't really have much in terms of shape.  I think if you want to recreate this look, you'd probably be better served using a different corset pattern (like Laced from this same line) and making it in alternating red and black fabric.

But the skirt is fantastic.  So once again, these patterns are only available from the cosplay.mccalls.com site.  You can see my other reviews of this pattern line here.   And in the next day or so I'll be posting a detailed review of one of the new corset patterns, with my test fittings.
>