I have a lot of projects and posts in the works, but I've been working furiously to get ready to vend at San Japan in August, so you'll have to excuse the lack of posts.
The only project I've been working on just for me is my Knitter's Companion Arm Bracer. And it's finally finished!
I freely admit that this project was inspired by someone else's creation: the incredible
Tailor's Assistant bracer by Mardigan Enterprises. When I first saw it I was blown away and tempted to buy it. But then I started thinking. I don't like sewing by hand. I don't do embroidery or anything in public. So I don't actually have a need for the tools on that bracer. What I DO have a need for are my knitting tools. And a plan started to form.
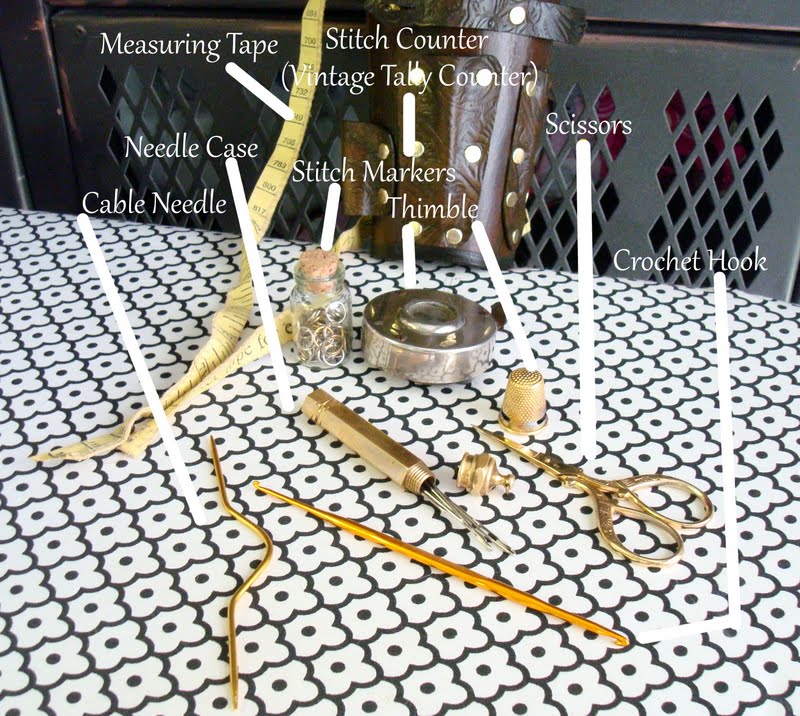
The first step was to figure out all the tools I typically need and try to find steampunk equivalents. The scissors were easiest, as I already owned a pair of small gold colored snips that look a bit antique. I also had a gold colored thimble, and although it's not used in knitting, I might need one for emergency costume repairs. For the rest, I started hunting around ebay and etsy to find appropriate tools. The most important one for me was to find something cool to act as a stitch counter. I looked and looked for brass stitch counters or tally counters. They apparently do not exist. So I got this vintage silver toned tally counter. I also bought a gorgeous vintage brass hexagonal needle case and a brass measuring tape from the 20s. Unfortunately the tape was in worse condition than I thought and was nearly unreadable. When I tried to clean the rust off it with vinegar, it disintegrated. So although I loved that case, I had to give it up.

The antique cloth measuring tape I have here actually came from an estate sale in a large container of sewing stuff. The funny thing is that it's actually a measuring tape made to estimate the weight of a calf. One side is inches and one size is estimated pounds at live birth. Which was so weird I had to keep and use it. My favorite stitch markers are plain brass ones from Knit Picks and I put them in a glass vial. The final tools are a gold colored cable needle I owned and a small crochet hook with I actually added at the last minute, since it's occasionally a really good idea to have a crochet hook when knitting.
 |
| The finished bracer before adding anything. |
Then came the difficult part: figuring out how to get all this stuff on an arm bracer. Well, actually, no. Next came figuring out how to make an arm bracer. This was actually quite easy. I've done a little bit of leather working before, but I'm no expert. I have a few basic tools and had leather on hand. But I would have probably been in trouble if I hadn't found
this awesome tutorial on making leather bracers. Seriously, if you're looking for a first leather project, I HIGHLY recommend this tutorial. I wish I had started with something this easy and clearly written. Also, you don't need any special tools.
 |
| I love my anvil! |
For the bracer I used some really thick leather that I got a while back for cheap. It's really too thick for my taste, and difficult to work with, but it was ideal for this. (It was supposed to be 6-8 oz thick, but I'm convinced it's more like 10-12). For the attachments to the bracer, I used a much thinner leather leftover from my earlier leather projects. It's the perfect weight (which I'm not sure of) and embossed so it gives it an extra feminine/Victorian touch. My favorite way to dye leather is to dye it brown and then go over that with black antiquing gel. I also got to use my new small anvil, which my husband bought for me at a garage sale. It really makes riveting easier, and made working on the shaped bracer possible.

To attach all my objects, I mostly played it by ear, while still trying to plan out where everything would go. The stitch counter was the most difficult, since I had to wet-mold a leather cover for it, but then attach it so that I could still remove the counter in order to reset the count. (The reset dial is on the back.) It took me two attempts to get something that would work for that. Most everything else was pretty straightforward, using pockets or simple loops. I did find the scissors wouldn't stay in the pocket, which is why I had to add that strap to hold them in. And the thimble was tricky. I had to look closely at Mr. Madrigan's design to see he had a hole in his thimble that he threaded the leather strap through. So I had to get my husband to make some cuts in the thimble with his Dremel.

The closure went through some changes. At first I had planned to use straps and buckles, but before I started I realized that the straps would be kinda tricky, plus I would need to buy buckles. So I decided I would lace the bracer on, as in the tutorial. This would allow for better adjustment for comfort, I figured. I intended to put brass grommets in the lacing holes, but the grommets I have (for corsets) weren't long enough to go through this thickness of leather. So plain holes it was. I intended to lace it with leather lace, but that ended up being pretty uncomfortable. And then I realized I had made a massive mistake. I had forgotten to attach my measuring tape to the bracer. And I didn't really have any room left. So I once again borrowed inspiration from the Madrigan bracer and laced it with the cloth measuring tape. It's much more comfortable than the leather lace, actually. And it means I will have my measuring tape close by.
The final finishing was to glue soft faux suede on the inside of the bracer. The underside of the leather was really rough and not something I wanted rubbing against my bare skin. And with that, my Knitter's Companion is done!
I'm quite happy with it. For someone who isn't really a leather worker, I think it's pretty impressive. It's a bit awkward to wear because it's heavy and has a tendency to slide down my arm and press against the wrist bones. I'm hoping with some wearing it will work better. But I'm quite happy with it, and it will certainly make finding and carrying my knitting tools much easier.