
When I made my first vest, I spent 4 days straight trying to get the damn pocket to work. And then I gave up and left it for 4 months. Finally I managed something close to a welt pocket. Well now it's been a year and I'm working on my sixth vest. It was on my fourth vest that I finally GOT the welt pocket. I could make one with a minimum of frustration and without having to reference the internet or any sewing books. It's still a long, complicated process, but it doesn't have to be impossible.
So here is my method of making welt pockets. (This is for a pocket with one welt on the bottom. If you want two welts, you can add another to the top of the pocket.) I apologize for the quality of some of these photos. It's hard to take pictures one-handed.
Welt Pocket Tutorial
The pieces you should have from your pattern are the piece into which you will insert the pocket, a welt (with interfacing), one pocket lining piece made from face fabric and one from lining fabric. In this example, I am making the pocket out of contrasting fabric.
1. Fold your welt piece in half lengthwise, wrong sides together. Stitch or baste about 1/4" away from the raw edge. (Your pattern may designate a different width.) Carefully place the welt on your vest front, aligning it with pocket placement markings. You want your stitching line to match up with the bottom of the pocket.

Stitch welt in place along your previous stitching line, leaving at least a 1/2" unstitched at either end. Do not backstitch because you may need to remove some of the stitches when you flip your welt through to the other side. You essentially only want to stitch the welt down between the sides of the pocket.

2. Place your lining pocket over the welt, matching the bottom of the pocket marking with the stitching line on the welt. The lining should be the same width as the welt, make sure these are aligned. This is the only piece I really bother chalking the pocket guide onto, but it is important to do so.

Baste along the top and bottom marks on the guide. Check to make sure your stitching is in the right place. It should be along your previous welt stitching line. Your pocket should be bigger than your welt when the welt is flipped up. If not, bring the top line of stitching up. You can adjust how much space you want between the welt and the top of the pocket opening in this way. You'll notice my basting is not perfect at all.

Stitch the lining in place, fixing anything you got wrong in the basting.

3. Cut your pocket opening. This can be tricky and you need to be careful. If you just grab your seam ripper and start slashing, you may put a huge gash in your vest front. Ask me how I know... So what I do now is start my hole with the seam ripper, making an opening large enough to get my scissors in there, then I carefully cut the rest with my shears.

You want to cut just the center line between the triangles, then carefully clip to the corners to make the triangles on the sides. Don't cut through the stitching at the corners.

4. Now here is my secret step. I work with a lot of poly brocades and other poly home decor fabrics. These tend to fray, and there's nothing worse than working with these little edges and triangle and trying to get them to stay in the right place and all the time they are getting smaller because they are fraying. So my next step on poly brocade is that I take a lighter to the edges of the pocket opening. This melts the edges so they will not fray. I do this before doing ANYTHING else because any handling will increase fraying, which will cause headaches.

Now before you set your vest on fire and blame me for it, please test this method on a scrap. Not all poly fabrics will melt neatly like brocade. Some just catch on fire and disappear, so you don't want to use flame with them. For these and any non-meltable fabrics, apply fray-check to the edges of the pocket and let dry before continuing. Or use clear nail polish. I like the instant satisfaction of fire, but this will work, too.
5. Once your edges are unfrayable, flip the pocket lining through the opening to the inside. You will also be flipping the welt up and into place.

The next part is IMPORTANT. You want to take the ends of the welt that are not sewn down and insert them through the side of the pocket between the vest front and the lining.

When you pull them through, your welt should sit nice and flat. If it doesn't or it's pulling the vest fabric up, you need to pull out or cut some of the stitching holding the welt to the vest. As I said earlier, the ends of the welt should not be stitched to anything. If this line of stitches is too long, it can cause fabric bunching, so pick out a few stitches until everything lies flat.

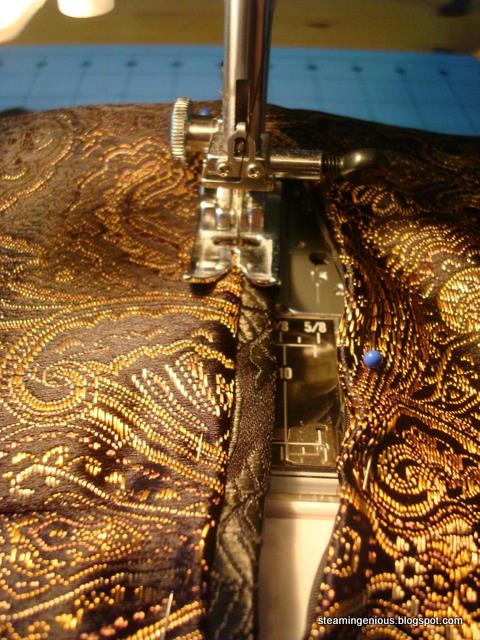
6. Once everything is flipped, pin everything in place as pictured above. This may be overkill, but I like to prevent any of these little pieces from getting in the way and getting stitched where they don't belong.
Edgestitch right below the welt, stitching through all layers. You only want to stitch one line right under the welt.
7. Now take your pocket piece that's made of your face or fashion fabric. On the inside, place this pocket piece over the lining piece, with the right side facing the front of the vest. This will show through the opening of the pocket. Pin all around, only catching the two pocket pieces, not the vest front.

Stitch all the way around the pocket. I like the catch the ends of the welt into this stitching for extra security, but if they are too small, don't worry about it. Just do not stitch through the front of the vest anywhere. (I don't worry about catching the ends of the tiny triangles at the sides of the pocket. They are kept in place by the ends of the welt and the final stitching step.

Notice my totally-not-neat stitching. Eh, no one will see this part. (Except everyone on the internet.)
8. (LAST STEP!!) - Turn the vest with the front up. Pin everything into place, all around the pocket opening. I also pin the pocket itself down so it doesn't get in my way. Topstitch around the three sides not previously stitched through all layers (i.e. the sides and top.)

Don't stitch under the welt. If you do this, you won't be able to open the pocket (Ask me how I know!) (You know when you buy expensive tailored clothes and the pockets are temporarily sewn shut? If you basted under the welt, you would get this effect, but that seems like a pain for the recipient of the vest.)
TA DA! Your pocket is (finally) finished!


Hopefully this demystifies the process for making these pockets. Once you make a few, you should be good to go with these. This past week I made four of these on one vest, and two on some 19th century pants I'm making for my husband. So if you're making period men's clothing, you have to learn to tolerate, if not love, the welt pocket.
May I just say that I love you more than words can describe right now? I just tried to make a welt pocket, and ended up destroying my vest because the instructions on the pattern are useless. Thank you so much for making this lovely and informative tutorial! I shall <3 you forever.
ReplyDeleteThank you very much your tutorial was really helpful!
ReplyDeleteI made this same vest for *my* husband a couple years ago with the same frustration, abandonment, success cycle as you. I even watched some Mexican woman make a diaper on youtube trying to figure the damn thing out! You show the *critical* steps of welt flap placement *and* flipping/tucking the flap. Good job! I Pinned you (heehee that sounds funny) and shared it on facebook. Bless your lil' heart!
ReplyDeleteThank you for this tutorial! I think it freaking saved my life/sanity/spendy vest material. I am so glad I found this - THANK YOU!!!
ReplyDeleteThis is actually the most helpful listing I've found for welt pockets. Thank you so much.
ReplyDeleteIf I had a medal to give away--say, for Conspicuous Helpfulness--it would so go to you. Not only do I finally understand this, I'm even sort of looking forward to trying it. Plus, your whole blog is fun. You've really stirred up the steampunkish yearnings I've had for the last few years. I'm looking forward to future posts,
ReplyDeleteTHANK YOU!! I'm where you were at a year ago -- trying to figure out the cryptic pattern instructions and waste of space diagrams, and ready to chuck the whole project. Simplicity my ass! Your step-by-step is perfectly clear and 100x better that the printed pattern. Thanks for taking the time to post this.
ReplyDelete---Joan
I just spent hours trying to follow the pattern directions hoping that if I just kept going it would suddenly make sense. I got to the stage of cutting it open and turning the pocket to the inside, but alas, all I had was a mess with the welt tucked away inside where it didn't show at all. I finally gave up and went to bed but couldn't sleep as my brain kept trying to figure out how to make this work. It occurred to me to check the internet and I got out of bed and found several videos on how to make a welt pocket but none applied to the pattern I had and then I found yours. HALLELUJAH! It is exactly the type of welt the pattern calls for only it actually makes some sense unlike the useless directions that came with the pattern. They might as well say "now magically make the welt pocket" and "good luck with that". I haven't actually completed the pockets yet but I think I understand the process now and can go to sleep and try again in the morning. THANK YOU!
ReplyDeleteThey might as well say "now magically make the welt pocket" and "good luck with that".>
DeleteSounds about right. Step 5: Make Welt Pocket Step 6: Add lining...
Oh Thank you! I thought I was some brain dead failure after an hour of trying to decipher WTF the pattern I was following meant. Granted my brain is still too boggled as to attempt it currently, but hopefully with these instructions I can finish my project!
ReplyDeleteThank you for this awesome tutorial. Looks like enough people have problems with these silly instructions that you'd think maybe Simplicity would clarify them, but whatever. On a side note, I'm making the vest in the exact fabric you have pictured! awesome!
ReplyDeleteNow it all makes sense. I was working with the same stupid pattern this past week. I found some cute Irish boy doing a video tutorial on youtube doing a double welt pocket so I went with that since my vest didn't have to be perfectly period. But if I decide to do it again with the single welt I will definitely follow your tutorial. Thank you so much. Simplicity my a$$.
ReplyDeletethank you for demystifying the dreaded welt pocket. I have done them several times and finally had my 'got-it' moment but am disgusted with all pattern companies for uniformly making the instructions read like a translation from urdu into chinese by a russian speaking spaniard. (no offence meant to any of the nationalities but the instructions are just that confusing)
ReplyDeleteWoohoo! Thank you so much. My studio helper and I were just at the swearing point, when I said, "Let me go google this!" And there you were. Thanks for putting this tutorial together for us. I've pinned it for posterity!
ReplyDelete-- michele
Thank you! I was going mad trying to follow the pattern making my husband's vest for my son's steampunk wedding ... now I can go ahead with a bit more confidence about doing four welt pockets on a vest!
ReplyDeleteFinally instructions that make sense! Step 2 "Place your lining pocket over the welt, matching the bottom of the pocket marking with the stitching line on the welt." was exactly what I needed to know. Thank you!
ReplyDeleteOh my goodness! You just saved my sanity with this! Thank you thank you thank you! Off to attempt my welt pocket for my husband's vest!
ReplyDeleteI know I'm old but this definitely shows me. I learned how to do this as a kid learning to sew. It's the same basic technique used for bound buttonholes. If you can find a video on YouTube or a Vogue Sewing book, especially the one from the 1960-70's, it would have this in there. You did a great job explaining it though. Haven't don't one in years.
ReplyDeleteI just threw away my Simplicity 2895 Vest away in complete frustration after I followed every instruction the best I could, only to find out I had no pocket in the end.
ReplyDeleteSo I wanted to say to you... THANK YOU for putting this much better tutorial on how to do welt pockets! You make it so much more easy to understand than the original pattern as well. :D Thank you, thank you, thank you! <3 <3 <3