
For my most recent (and third) corset project, I wanted to try out the Laughing Moon Silverado Bust Gore pattern. I also needed something to wear under a full Victorian outfit, so I decided to use the materials I had on hand to make a simple corset. I wanted something that wouldn't show under clothing, so I decided to try a mid-bust for the first time.
For my first mockup I didn't make any changes to the pattern, other than redrafting it to the sizes I eventually used for the LM Dore I made a few months ago. (In this case, the bust is two sizes smaller than the waist and hips.) For the bust gores, I wasn't sure what size to use. I wear a DD bra, but I've been measured at a DDD. Figuring it would be easier to take away than to add, I used the 3D size gore.

As you can see, the corset fit well, except for the bust. Obviously they were too big. Also, the corset completely met at the back, which is a first for me.

I took the bust gore apart and tried it using the DD size gore, but I wasn't really happy with the result. That seemed to push my breast up too high and showed more over the top. I realize that actually the bottom of the DDD bust cup fit me well, it was the top that was the problem. So I just pinned the top 2-3 inches of the bust until I was happy with the fit. I ended up with a 2nd panel that is very skinny at the top, and gores that flare out and then angle back in.
I also decided to add a little more fabric at the top so that if I chose to wear the corset as outerwear, I wouldn't have to worry about falling out of it. To this end I added 1 1/2 inches to the pattern pieces at the top, expecting to take some back off. In the following picture, I've folded down about 1/2 at the top to get the look I want. I also wanted to decrease the size of the corset by about 2 inches around to get a gap at the back, so instead of messing with the fit, I used a 5/8th inch seam allowance instead of a 4/8."

I'm very happy with the fit, but the hip is now a bit too small and the bust still a bit too large. For the final pattern I took 1/2 inch back off the top and added a very small amount to the hip, while shaving a bit off a couple of pieces in the bust.
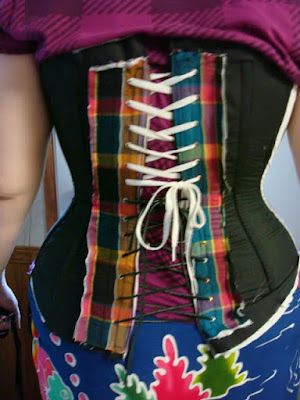
For the final corset I wanted it to be as thin as possible and as breathable as possible. The strength layer would be cotton duck, since that's what I had. I decided to use external channels to cut down on having extra fabric layers. I had some 1/2" spiral steel that I needed to use, so I used that, centered over the seams. I intended to make external channels for my 1/4" bones in between the seams, but I ran out of black duck, so I had to use brown duck on the inside. The lining is a floating lining made of quilting cotton.


These aren't great pictures, but I've been trying to get pics for a week, and my husband is just not good with a camera. The finished corset is very comfortable. I intentionally didn't make the waist very small, because I wanted comfort. This doesn't reduce my measurements much at all. But it does make me smoother and gives me back support while I'm in costume. At the time these were taken, I wasn't laced as tightly as normal, because I'd been slouching on the couch in it. I can lace the back completely closed and still be comfortable. It's possible this is because I've lost about 4 pounds recently. As I'm still trying to lose more, I may be in trouble with this corset. But other than the fact that I wish it had more of a gap, I'm quite happy with it.
The bust gores are way more comfortable for a large bust that a normal straight corset, even one that fits well. It's more comfortable than a bra, too. The only thing that isn't completely comfortable is that I put the waist tape about 1/2" too high and at times it presses on my ribs. But I still wore this for over 12 hours last weekend and was comfortable.
Actually, the only problem I had is that after a certain point, I took off my costume top because it was nearly 100 degrees, so I spent the rest of the day just in my corset and tank top. And because the duck is on the outside, the inside of my arms rubbed raw from the rough fabric. So that makes me wish I had covered the duck. But I never would have considered that.
Here's the lining, because it's prettier than the outside:

And I tried to take a picture of the finished bust cup:

I'll definitely use this pattern again, now that I've got it nearly perfected. (Oh, and just in case you want to see it, this is me wearing my Victorian dress over this corset.)
Great job I am too scared to even try lol
ReplyDelete@Nelly
ReplyDeleteIt's not really that corsetmaking is difficult, so much as time-consuming. You can't skip steps if you want a good result. But the actual assembly and sewing is fairly simple.
Thank you so much for this. I bought this pattern some years ago to make myself a corset and, despite having been sewing my own clothes for 5 decades, I don't think that I've ever seen such an appalling set of instructions in my life and the drawings look like a 10 year old has done them (although that's insulting most 10 yr olds!) :o)
ReplyDeleteThe first one I made was the Doré and I thought was bad enough but I swear I would have had a terrible time with this Silverado I'm making for a friend. I know I wouldn't have worked this out without your pictures so I am really grateful that you took the time to post the pictures.
Linda