Tuesday, March 27, 2012

Modified Suitcase and Mirror

I'm busy getting ready for The Nightmare Machine Con this weekend, but I have a couple of quick projects to share with you.


First of all, my husband bought a couple of small mirrors at a yard sale to use at our vendor booth.  I think he paid $.25 or $.50 for both.  I thought they looked pretty boring, so I decided to try some "distressed" painting.


I used a paint-on white primer from the hardware store as my base coat. I didn't sand or anything, just put two good coats on it so it was nice and white.  Then I spray-painted flat black on top of that.  I took some sandpaper to it and distressed it by hand so that the white shows throw in places.  I think it came out pretty good, though not perfect.  It's more interesting than it was before.


The other project is a mod of a vintage suitcase we recently scored.  We were with our friends vending at an arts market and the antique store next door had a pile of old suitcases out front with a 50% off sign on them.  Most of them were ugly plastic 70s ones, but there were two older cases.  One of my crewmates had already said she wanted one, but I fell in love with one, too.  Turned out we were in love with two different cases, and I got the one I adored.  We paid $18 for it, which I think is a steal.  Nice old leather suitcases are getting really hard to find.  It wasn't in great shape: it was pretty beat up and "weathered".  The leather on the bottom was destroyed and torn.  But it had tons of character.  I decided it would be good to use as a vending display, and my husband decided he wanted to put shelves in it.  So we did.


We wanted to preserve the aged and beaten up nature of the case so we didn't do any major refurbishing.  I cleaned it as best I could.  The fabric on the inside was coming off and pretty dirty.  I wiped it up, but it still has some stains on it.  I considered recovering the inside, but I really liked the fabric and it really felt right for the case.  So I glued the fabric back into place and called it done.  For the bottom of the case, I recovered it with some faux suede I had on hand.  It's not gorgeous, but it works for a part that won't be seen much.  It also served to reinforce the hinge of the case, which was a little wobbly.  My husband made the shelves from plywood and stained them before installing them.  I think it's going to look good with steamy goodies all over it.

Tuesday, March 20, 2012

How to Tell a Quality Corset from a Not-so-Great Corset

I spend a lot of time looking at pictures on the internet.  Call it research, inspiration, or just procrastination, but several things become apparent when you look at steampunk and corset pictures all the time.  One of them is that a lot of people out there can't tell the difference between a good corset and a bad corset, at least from a picture.   So often I see someone talk about how great a corset is, only to look at it and go, "Huh?  That's CRAP!"

Now, ok, you can call me a corset snob if you want to.  I mean, yes, I look at lots of really gorgeous corsets that I could never actually afford to own.  And my own corsets that I make are by no means perfect, or even close to the highest quality corsets out there.  But I've bought some really crappy corsets over the internet in my time, and I don't want others to make the same mistake.

So there are things to look for when looking at a photo of a corset.  The biggest, number one indicator of real corset quality is wrinkles.  The very best corsets have none.  This is because the corsetiers who make these corsets have magical powers, I'm pretty sure.    Check out this AMAZING corset by V Couture:

Smooth as anything.  Also, probably the most beautiful corset I've ever seen.

Now, as I mentioned, you're probably only going to find this level of flawlessness in a couture corset handmade by a professional.  But there are plenty of other levels of quality between this and complete crap mass-produced in China.


High quality corsets look hard.  And I don't mean difficult to construct.  I mean that the surface of the corset looks solid.  This is usually due to a combination of high quality fabric(coutil) and lots of boning.  This underbust is a great example of what I mean:
Compare the solidity and smoothness of this, with a mass-produced (but still somewhat decent quality) corset:
High quality corsets have a lot of boning.  The job of boning in a corset is to hold the fabric taut, preventing it from getting crushed or crumpled or wrinkled.  Steel boning is what you're looking for, but you're also looking for the quantity and placement of the boning.  All corsets should be boned at every seam.  Some are double-boned, meaning there is a bone on both sides of each seam.  Often there are bones in between the seams, too, unless the panels are very small.  What I see a lot of in low-quality corsets are large panels with no boning within them.  It gets to the point where I'm thinking of this garment as a lightly boned top rather than a corset.  Here's an example of what I mean:

Now, don't get me wrong.  I like the style of this corset.  It's unique.  I pinned it for a reason.  But looking closely at it, there are probable four panels for each side of the corset, eight in all.  That's a really low number for corset panels.  It means it's difficult to get much actual shaping with only four panels.  This isn't going to cinch your waist.  Plus, the only boning is on the seams.  There are only a few seams, so very few bones.  You can see how loosely draped the fabric is, free to wrinkle all it wants.  I would not consider this a "real" or "serious" corset.  

Finally, a quality corset is going to cost a few bucks.  Now that can range from $60-600, depending on the corset and who made it.  But if you find a deal too good to be true, like a $10 corset on ebay, it IS too good to be true.  For more about the differences between a designer corset and a cheap Chinese knockoff, this is a GREAT article and video from Fairy Gothmother.

So I hope some of this information is helpful when you're trying to judge the quality of a corset.  If you want some more corset eye-candy, take a gander at my Corsetry board on Pinterest.  

Monday, March 19, 2012

Simplicity Steampunk Pattern, and LOADS more patterns with potential

First of all, there's a really exciting new pattern from Simplicity.  It's a new steampunk pattern!  It's really an attractive outfit with some nice pieces.  The bolero jacket is really lovely, in both its variations.  If I hadn't already made a bolero, I'd probably use this pattern to make one.  The overskirt is also really nice, thought I'm not sure how the bustling is done in the back.  But the apron has a great look to it.  I'm also really intrigued by the underbust "bustier" pattern.  Now, their pattern is probably all weird sized to be a real corset, but I would use it to make a real corset, and it looks like it could be a very attractive underbust.  So, in short, I'm dying to get my hands on this pattern.

There also a new Simplicity Civil War dress pattern.  Normally I ignore the Civil War/Early Victorian patterns, but they are kinda growing on me.  Besides this one has a really nice bodice that could work really nicely with a steampunk outfit.

There are a few Vogue patterns that are new-ish but I thought I'd point out as possibly being useful for steampunk.
Corset Top and Skirt - The closed front corset is attractive, and I really like the slimmer skirt.  These are modern formal wear, but could easily be steampunked.
Interesting skirt and capris
Another interesting skirt and capris
Completely insane skirt  -I know, that example is HIDEOUS.  But if you look at the line art, I think the skirt has huge potential to be cool.

And I happen to be looking through a bunch of pattern sites right now, and I'm going to be posting the really good steampunk-ish patterns I find, regardless of their release.

Folkwear :   This site has a lot of patterns for traditional dress from all parts of the world, so it's a good place to look if you want to make a non-Western steampunk outfit.  There are some nice Near and far Eastern patterns. I have never made one of their patterns, so I can't speak to how well written they are.
Belgian Military Chef's Jacket - This is an awesome jacket that has a really nice dieselpunk military feel.  For men or women.
Victorian Shirt - Although this looks like a nice shirt, I recommend the Laughing Moon Victorian shirt pattern, because it has lots of variations to cover informal, formal, and a long range of time period.
Missouri River Boatman's Shirt - Same situation as above.
Gibson Girl Blouse - This, on the other hand, is a very nice Edwardian blouse that I haven't seen a similar pattern for before.
Vintage Vests -  This is a nice pattern for period vests, for men or women. I like the double breasted one, especially.
Edwardian Bridal Gown - This is a nice Edwardian or Very Late Victorian dress.
Big Sky Riding Skirt-  -A split leg pant with folding panel to make it look like a skirt from the front.  Good for Westernpunk.
Vintage Bathing Costume -  What it says on the tin.
Countryside Frock Coat- Men's and Women's frock coats

There's another neat site I found full of FREE downloadable patterns.  Because there are no thumbnails and the descriptions don't really tell you much about the pattern, I have done the hard work and gone through ALL the patterns and picked out the good ones.  (Ok, the women's patterns.  I lost my will somewhere at the beginning of the men's patterns.  Guys, I'm sorry.)
Corset Top - Could possibly be made into a real corset with some work
Another Corset Top
Simple Ruffle-Front Blouse
Blouse with Chiffon Sleeves - I love the shape of this blouse.  It looks like a corset and bolero.
Fitted Vest
Women's Tailcoat
Long Jacket/Coat with ruffled edge
Double-breasted jacket with short puffed sleeves
Safari Jacket
Jacket with lots of pockets
Lacy dress with long sleeve
Skirt with flared inserts
Skirt with flounce - This is a weird skirt, but might work for an overskirt?
Diagonal skirt - Another different one, with potential.
Curved Seam Slinky Skirt - I REALLY like this skirt.  Would be great for dieselpunk.
Skirt with zip-up gusset  - I probably would leave out the zipper, but this would be a nice skirt for a mechanic or similar character.
Wrap Skirt with Buttons and Back Lacing
Long Skirt with Diagonal Seams 

Men - As I said, I stalled on going through the men's patterns, but I did find one Military Jacket.  Most of the men's patterns seem pretty boring and standard, but if you're looking for patterns for classic wardrobe pieces, go to town.

If there are any patterns of note in the Butterick/McCall/Vogue summer catalog, I'll edit this post to include them when they are released.

Sunday, March 11, 2012

Corded Corset from Antique Pattern

My latest corset project is something of an experiment for me.  I needed a new corset to wear on a daily basis around the house (for back support).  I also wanted it to work as an underwear corset to wear under my Victorian day dress.  My previous corset made for the purpose is completely worn out.  I didn't make it to be particularly strong, and then I ended up wear it every day for six months.  It also was always too big and laced up totally closed in the back.

I could have used a corset pattern that I've already perfected, but where's the fun in that?  So I started playing with various patterns.  I've been wanting to try the more advanced technique of using an antique pattern from a corset book and resizing it to my measurements.  I had my eye on a corset in Norah Waugh's Corsets and Crinolines, and when I found a downloadable full-size version of it, I was sold.

Here's the original illustration for this corset:

To bring it up to my size, it was pretty simple.  I measured the pattern carefully, getting the bust, waist, and hip measurements, then figured out how much  I needed to add for it to fit my measurements.  Since the original pattern is only 5 panels per side, I decided to add a panel in stead of trying to add a little to each existing panel.  I basically copied the side panel again, adding about a half-inch to one side, and moved on to the mock-ups.


Here is my first mock-up.  It actually fits pretty well, except in the boobs.  Although the pattern looked like it had a lot of breast room, it felt like it had none.  There was no curve for the breast to sit down in, it just pressed up and out.    So I pondered what to do and decided to pull out my modified Laughing Moon Dore pattern and copy the bust curve from that pattern.  So I lay the Dore pattern over this pattern, and traced the shape of the bust curve from the first two panels of that corset, that I knew fit me well.


I remade the first two panels of my mockup and replaced them.  You can see how much better this fits my bust.  So right there, I was happy, and moved onto the actual corset.  I DID make a few changes as I assembled the pattern and the corset pieces, though.  I cut some off of the front, but not too much, since I had a long busk to use.  I took a tiny bit off the top, since I wanted this to be an underwear corset as well, and didn't want the top sticking up too far.  (I shouldn't have done this, in hindsight.)   After my corset was together, I cut some huge curves out of the front to keep the bones from poking me in the thighs when I sit.

Here's the finished corset.


Some of my limitations in making this corset were that I was reusing the materials from my old corset.  So the busk is much longer that I would have preferred, hence the huge point in the bottom.  But it's a really nice quality busk, so I don't want to get rid of it.  I cut the shape into the bottom to make it more comfortable.   It's made of two layers of domestic (cheaper and less dense) coutil, with 1/2 inch spiral bones at the seams.  It's constructed with the folded seam method, for maximum strength and longevity.


This was also my first attempt at cording.  Cording is a technique used a lot in antique corsets in which twine or some other string-like substance is pulled through narrow channels sewn into the corset panels.  This provides stiffness without bones and is used a lot on the bust and hip gores for extra support that's comfortable.  The original pattern had cording over the bust, and I decided to try it.  I like the way it looks, but it doesn't really do anything for me in how it feels to wear.  For as much time and effort as it took to do the cording, I wouldn't bother doing it again.  Plus, I think it made the fabric over the bust TOO stiff and it flattened the shape of the bust out some, so that it doesn't curve as nicely.


At first I wasn't happy with the fit much at all.  But then I realized I had it on too low.  If I put it on as pictured, it's really pretty comfortable.  I've also worn it for a few days and broken it in now, so that's why it now has the wrinkles at the waist.  Those have developed from me bending in the corset.  I am happy with the shape it gives me.  It will be really nice as a base for Victorian clothing because I have a smaller waist than previously.  Tightened more than is really comfortable, I can get a 5" reduction with this corset, which is the most I've managed.


Overall, I've come away with a wearable corset that will do what I wanted it to, but I also learnt some lessons on what not to do in the future.

Evolution of a Steampunk Outfit


There are two questions that myself and other steampunks get asked fairly regularly: "How long did that outfit take you to make?" and "How much did it cost you?"  These are generally really difficult questions for most steampunks to answer.  Other cosplayers tend to decide to recreate a specific outfit, build that costume until it's finished, and then wear it.  But most steampunks are constantly adding and modifying and upgrading their costumes.  Everything a steampunk has on may represent years of searching and making and buying.  So we honestly have no idea how many hours we spent on a particular costume or how much it all cost put together.  We're picking up bits here and there, making pieces, embellishing them, adding, borrowing from other outfits, etc.

To illustrate this point, I'm going to take you through my black and silver outfit from birth to the present and show you how it's changed.

January 2011 - Clockwork Wonderland- Dallas, TX
This is the first time I wore my black and gray outfit.  The black overskirt/bustle skirt is something I made from scratch to go with a previous steampunk outfit, so that garment was doing double duty.  The gray petticoat skirt I sewed from a bedsheet using the free instructions here.  The corset is a steel-boned underbust I bought on ebay. The shirt under the corset is from Target because I just needed SOMETHING to wear with this outfit.  The fingerless gloves were handknit by me from this pattern.  My steampunk belt of chains and steamy things is something I put together for my previous outfit as well.  Most of the things on it came from ebay or etsy or I already owned.  And finally, the wrap is a plain black wrap I already owned and I'm wearing it because it's cold out.


Here's a side view.  You can see that even though I have bustled fabric poufs in the back, it's totally flat because I'm not wearing a bustle pad or cage under the skirt.


March 2011 - All-Con, AggieCon - Dallas and College Station, TX


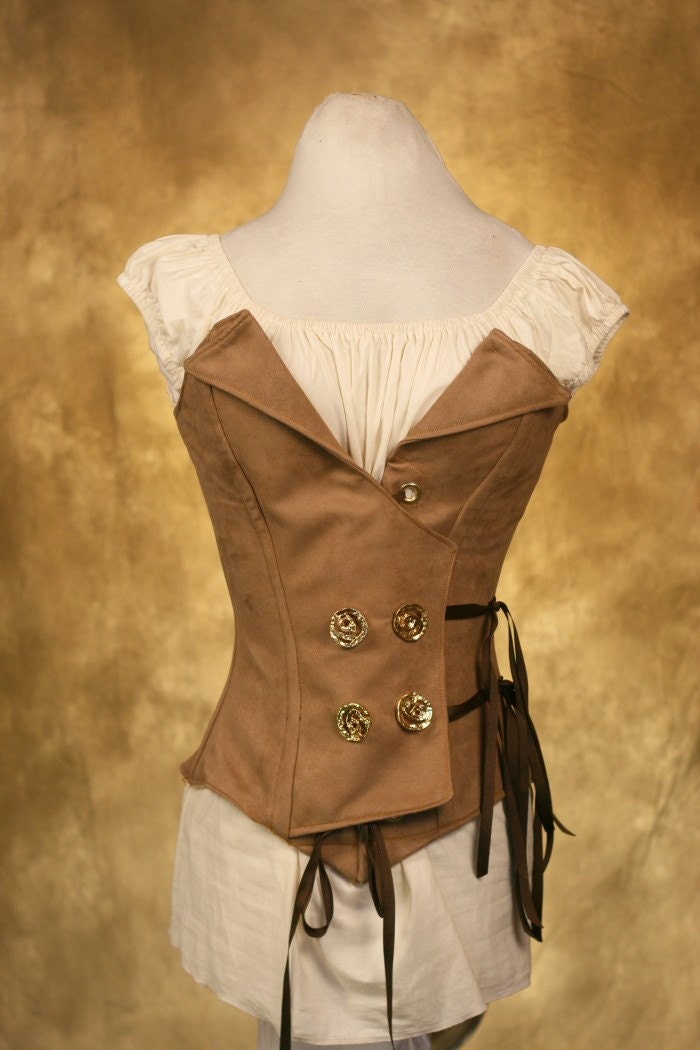
 In two months I had made some changes.  First I modded the corset by sewing a fabric panel over the front opening and attaching some gold buttons.  Around this time I was really interested in using knitting to make parts of my steampunk costume.  So the T-shirt/sweater I'm wearing under my corset is handknit by me.  The lace opera gloves are also handknit from some gorgeous 100% cotton laceweight yarn.  They actually are meant to go over the elbow, but they wouldn't stay up.  I've also bought some skirt clips and clipped up the front of my overskirt.


This photo shows a couple of other changes.  I now have gray heeled Doc Martens and I have made myself a bustle pad.  Now my skirt is a little more Victorian in shape.


April 2011 - Aetherfest - San Antonio, TX


There are only a couple of small additions to my outfit here.  I made myself some hair falls out of black and silver feather yarn, and I asked my friend Linda to make me a hat to go with this outfit.  I had just gotten the hat from her at the event, and hadn't sewn in any combs so it's not on my head correctly.  And I put some elastic at the top of my gloves, so they stay in place now.  (Also, I'm at the Alamo.  Just, in case you didn't notice!)


August 2011 - San Japan - San Antonio, TX

Absolutely nothing has changed from April-August, except that I have my hat on correctly and you can see it better.  Also, I'm really hot in my sweater.  That's probably why I'm not wearing the opera length gloves. So it was around this time that I decided I needed to get rid of the sweater top and make myself a new corset for this outfit.
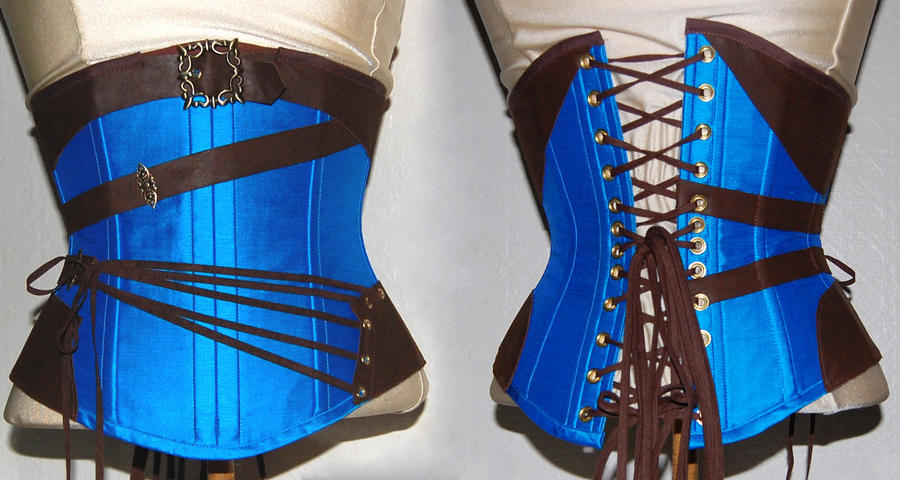


So I made myself a black and silver corset and  a black bolero to go over it.   I didn't finish these until December.  


January 2012 - Clockwork Con - Austin, TX

 So here's the bolero all steamed up with some extra large, antique brass hooks and eyes and various medals.  There are lots of other little additions to the outfit.  I found a little octopus plaque/cameo and glued it to the front of my hat.  I also have a new spiffy gun with a custom holster a friend made me, and I've added a few other things to my belt as well as changed the way the chains hang so it's more of a chatelaine and less a belly dancing belt.  What you can't see is that I also added some black braid trim to the bottom of my bed-sheet petticoat.


February 2012 - Twisted Gears - Houston, TX


I knew I wanted to make a new underskirt to upgrade from my awesome-but-still-a-bed-sheet petticoat.  So I measured how much of the silver brocade fabric I had left and went looking for a pattern.  I finally settled on the Truly Victorian 261 for the overall versatility of the pattern.  I got frustrated with another project last week and so I whipped this skirt up in a day and a half.  When I wore it this past weekend I got so many compliments on my totally tied together outfit or "dress."


The fact that the corset has side panels made from scraps leftover from my overskirt that I made over a year before really ties it all together.  It looks like I made this all at once, or as if I knew what I was doing.  But both my time and my costs were spread out over about a year and a half.  


So for now, this outfit is "done."  Until I decide that the underskirt needs some braid or trim or the jacket needs epaulettes or just way more medals...
>